If you’re like most men, your first experience with a tie probably consisted of your pop wrapping one around his thigh, prepping the knot, then sticking it around your neck and voila! You were ready to go! Or worse yet, your mother brought you one of those clip-ons from the 99 cent store. It probably went well with that 70’s or 80’s plaid jacket she got you. Like Vince Vaughn said in Swingers, “You’re all grownz up now” so it time for you to not only fix a tie correctly but be familiar with a tie knot or two.
Four-In Hand Knot
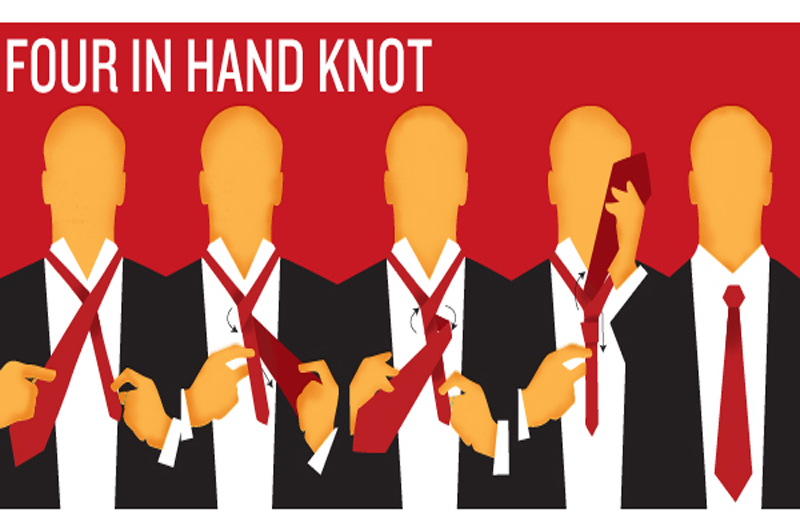
The Four-In-Hand is the standard of tie knots. It is the most used, likely because of its simplicity and because it goes well with virtually every type of shirt collar. To prepare, turn up the collar of your shirt, button the top button, then put the tie around your neck. Medium height men should position the narrow end of the tie at waist level. Tall men should position the narrow end a little above the waist.
Step 1: Just below the collar, lay the wide end over the narrow end.
Step 2: Take the wide end behind the narrow end.
Step 3: Bring the wide end across the layover.
Step 4: Holding a finger in the loop, bring the wide end up, then down through the loop.
Step 5: Holding the narrow end, pull the knot gently up to the top shirt button.
When the knot is finished, the narrow end must be concealed and the wide end should be level with your belt.
FYI: This style is perfect for men of medium height, tall men, or those with wide, Evander Holyfield-like necks. As for fabric, be careful, this knot is narrow when tied with a lightweight fabric and wider when used with thick material.
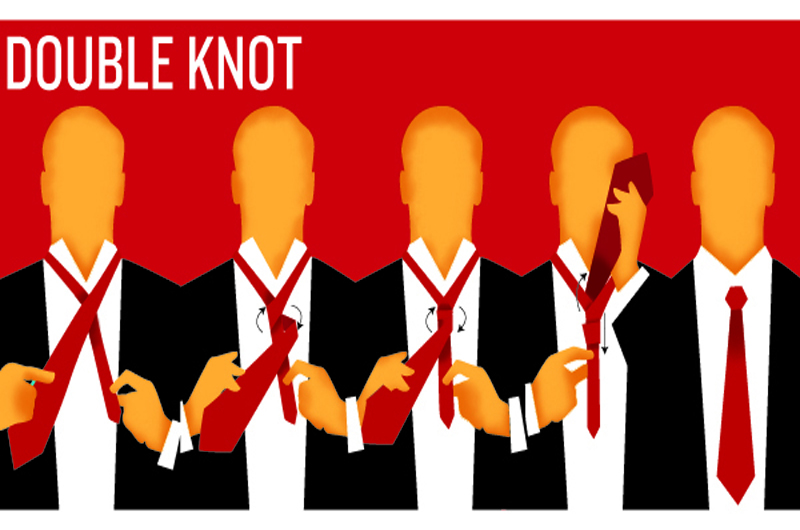
The Double Knot
The Double Knot is very similar to the Four-In-Hand and also goes well with most shirt collars. The difference is an additional layover that makes it a thicker knot. At the beginning, the wide end is wrapped twice over the narrow end. To prepare, the two ends of the tie must be different lengths. The wide end must hang down much further than the narrow end.
Step 1: Just below the collar, lay the wide end over the narrow end.
Step 2: Take the wide end behind the narrow end a second time.
Step 3: Bring the wide end up and under the layover and then into the loop formed by the first or second layer.
Step 4: Finally, adjust the knot and slide it up to the center of your collar.
FYI: This knot does not discriminate and works well for men of all sizes and frames. It is also perfect with all types of ties fabrics except for very thick fabrics.
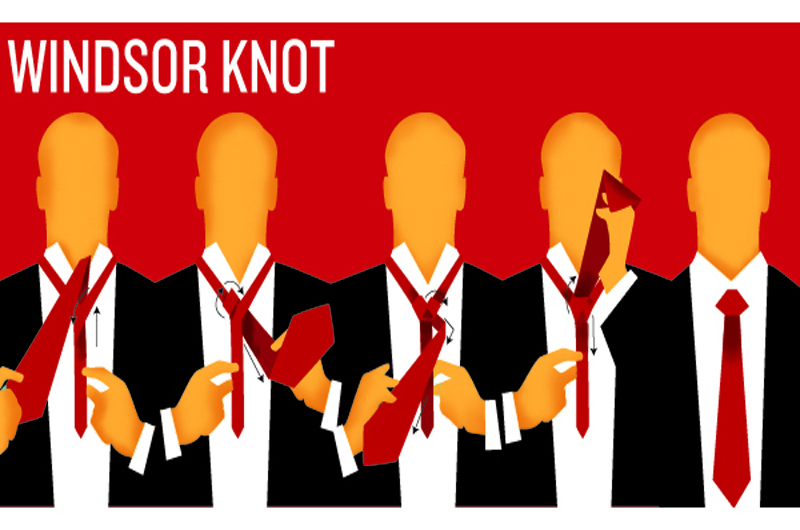
Windsor Knot
Named after (you guessed it) the Duke of Windsor, although some dispute this, the Windsor is a wide triangular knot that is usually worn for formal events. This knot looks best worn with a shirt collar that is wide spread or spaced. To prepare a Windsor Knot, first button up the top button of your shirt and turn up the collar. Then slide the tie around your neck. The two ends of the tie must be of different lengths. The wide end must hang down much longer than the narrow end.
Step 1: Lay the wide end over the narrow end.
Step 2: Bring the wide end up through the gap between the layover and your neck.
Step 3: Take the wide end to the right behind the layover, then forwards and up, then down into the gap between the layover and your neck.
Step 4: Take the wide end round the front of the layover, up close to your neck, and down through the loop just formed.
Step 5: Hold the narrow end and tighten the finished knot by pulling it gently up to center it on your collar.
FYI: This knot is better suited for men of a medium or shorter height or those with narrow chests or thin necks. It works best with lightweight fabrics.
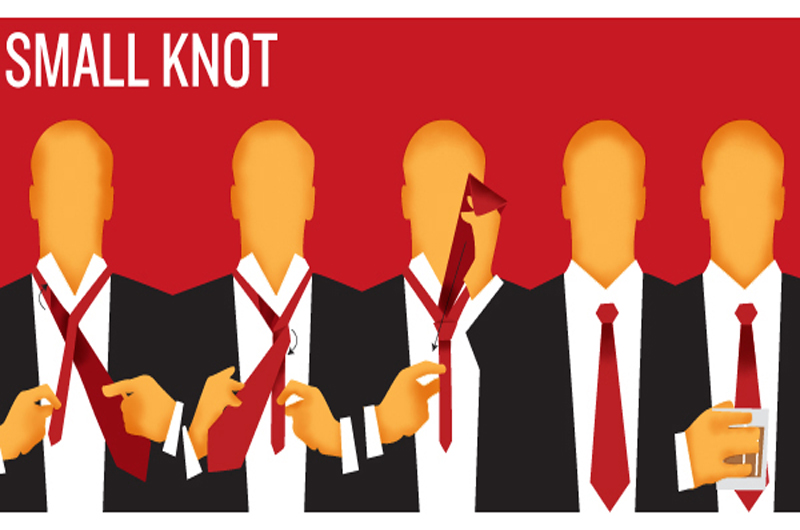
The Small Knot
The Small Knot is considered the easiest of all the knots. But don’t use it on collars that are long or wide-spaced as it will make the knot appear even smaller and ruin any type of symmetry. To prepare this knot, put the tie in place around your neck then twist the wide end 180°. To avoid doing the twist you can simply place your tie around your neck back to front. The wide end needs to be longer than the narrow end.
Step 1: Under the collar, lay the wide end over the narrow end.
Step 2: Now run the wide end over the layover.
Step 3: Hold the layover with one hand and run the wide end behind the layover and up. Smooth out the wide end and slide it down through the loop of the layover.
Step 4: Adjust the knot, sliding it up to your collar.
FYI: As with the Windsor Knot, the Small Knot is better suited for tall men or men with wide chests and/or wide necks. Not much guess work as far as tie fabric goes. Standard or thick fabrics both work well.